
Raw oysters are a seafood delicacy, but serving them the right way can elevate the experience. Here’s how to do it like a pro:
- Choose Fresh Oysters: Look for tightly closed shells and a clean, ocean-like scent. Store them at 32°F–39°F and keep them on ice during transport.
- Master Shucking: Use an oyster knife and protective gloves. Gently wiggle the knife into the hinge without forcing it.
- Keep Them Cold: Serve oysters on crushed ice to maintain freshness and prevent bacteria growth.
- Add Classic Garnishes: Offer lemon wedges, mignonette sauce, horseradish, and cocktail sauce in chilled ramekins.
- Experiment with Flavors: Try unique toppings like Asian-inspired sauces, fruity mignonettes, or spicy drizzles.
- Present Beautifully: Arrange oysters on a platter with hinges inward. Use ice, rock salt, or foil to keep them stable.
- Pair with Drinks: Serve crisp white wines, light beers, or citrus-based non-alcoholic beverages for a perfect match.
- Set Up a Station: Organize a prep area with tools, towels, and condiments for easy serving.
How to Serve Fresh Raw Oysters
1. Select Quality Oysters
Choosing the right oysters is crucial for serving them at their best. Knowing what to look for and how to handle them properly can make all the difference.
Start by inspecting the shells. Good oysters should have tightly closed shells and feel heavy for their size. If you tap the shell and it doesn’t close, it’s a sign the oyster is no longer alive - discard it.
When buying oysters, make sure they come straight from cold storage. The ideal temperature for storage is between 32°F and 39°F [3]. According to Jason Hedlund, global seafood buyer at Whole Foods Market:
"Remember to look for oysters that are displayed on ice, tightly closed, feel heavy for their size, and have a harvest tag displayed with them to indicate how long they have been out of the water" [4].
Smell is another key factor. Fresh oysters should have a clean, salty scent, similar to ocean air. If they smell overly fishy, it’s a red flag [6]. Proper handling during transport is just as important as selection.
Follow these tips for transporting oysters:
- Check the harvest tag: This will tell you when and where the oysters were harvested - important details for planning your event.
- Keep them cool: Use a cooler with ice packs to maintain the right temperature.
- Position carefully: Place oysters on top of the ice, but avoid letting them sit in melted water [5].
Whenever possible, buy oysters from trusted suppliers who follow proper cold chain practices. Fresh oysters should look moist and have natural seawater inside their shells [3]. Steer clear of dry or sticky oysters, as these are signs of poor storage or declining quality.
2. Learn Basic Shucking Steps
Once you've picked out high-quality oysters, it's time to work on your shucking skills. A good technique ensures both safety and a polished presentation. You'll need two essentials: a reliable oyster knife and proper hand protection.
For beginners, a New Haven-style knife is ideal. Its pointed, upturned tip makes the process easier. Popular options include the OXO Good Grips Oyster Knife and the R Murphy/Ramelson New Haven Oyster Knife, both known for their dependable performance.
Safety is key when shucking. Grace Kelly, Senior Editor at Serious Eats, warns:
"A dull oyster knife makes for a miserable (and potentially dangerous) experience." [7]
To stay safe, use a cut-resistant glove or a thick kitchen towel to protect your hand.
Step-by-Step Shucking Guide
-
Preparation
Rinse the oyster under cold water to remove any dirt. Place it cup-side down with the hinge facing your dominant hand. -
Opening
Gently insert the knife tip into the hinge and apply light, controlled pressure with a slight wiggling motion. Culinary expert J. Kenji López-Alt advises:"You don't want to push too hard with the knife - this isn't about forcing it between the shells. Instead, this is all about finesse." [8]
-
Separating
Once the shell pops open, slide the knife along the inside of the top shell to cut the adductor muscle. Remove the top shell completely. -
Finishing
Run the knife under the oyster to fully detach it. Check for any shell fragments, and flip the oyster meat for a cleaner presentation if needed.
To keep the oysters fresh while you work, store them in ice water. With practice, these steps will feel effortless.
| Common Shucking Mistakes | How to Avoid Them |
|---|---|
| Forcing the knife | Use gentle wiggling at the hinge |
| Skipping hand protection | Always wear gloves or use a towel |
| Rushing the process | Take your time to position the oyster properly |
3. Use Ice to Keep Oysters Fresh
Keeping raw oysters at the right temperature is essential for freshness and safety. According to the FDA, oysters should be stored at or below 40°F (4.4°C) to prevent bacteria from growing [5].
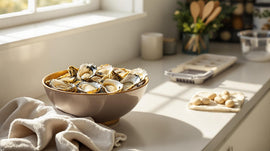
Setting Up an Ice Bed
Start by chilling your serving bowl for about 30 minutes. Line the bottom with a folded paper towel to help with stability, then fill the bowl with crushed ice. Crushed ice works best because it molds to the bowl and keeps the oysters cold. Arrange the oysters on top, placing their hinges inward for a neat presentation.
Tips for Maintaining Temperature
Place the oysters directly on the ice but keep them away from any melted water, as it can affect their taste and safety. Check the ice regularly and add more as needed. Alternatively, serve oysters in smaller portions to ensure they stay cold throughout.
Making Room for Garnishes
Leave space on the ice for garnishes like mignonette sauce or lemon wedges. Use small, chilled ramekins to keep these accompaniments cool and organized. This setup not only keeps everything fresh but also adds to the visual appeal.
4. Prepare Standard Garnishes
Once your oysters are chilled to perfection, it's time to focus on presentation. The right garnishes not only elevate the visual appeal but also let guests tailor each bite to their liking.
Classic Mignonette Sauce
A mignonette sauce is a timeless pairing for raw oysters. Here's a straightforward recipe to complement their briny flavor:
| Ingredient | Amount |
|---|---|
| Red wine vinegar | ¼ cup |
| Minced shallot | 1 tablespoon |
| Coarsely ground black pepper | ¼ teaspoon |
Mix these ingredients and let the sauce sit for about 15 minutes to let the flavors blend. For a twist, Chef Linda Wessells suggests swapping in champagne and fresh strawberries for a more delicate flavor profile [9].
Essential Accompaniments
Round out your oyster platter with these go-to garnishes:
- Fresh Citrus: Lemon wedges, quartered and ready to squeeze, add a burst of acidity.
- Cocktail Sauce: Mix ketchup with freshly grated horseradish, a dash of lemon juice, and a few drops of Worcestershire sauce.
- Fresh Horseradish: Finely grate for an extra layer of sharpness.
- Hot Sauce: A quality hot sauce adds the perfect kick for spice lovers.
Serving Tips
Serve garnishes in chilled ramekins placed on ice. Use small spoons or droppers for precise serving, and add liquid garnishes just before serving to keep them fresh.
Creative Variations
Want to mix things up? Try these options for a modern twist:
- Replace red wine vinegar with white balsamic vinegar in the mignonette.
- Use ponzu and fresh ginger for a light, Asian-inspired flavor.
- Sprinkle crushed pink or green peppercorns for a subtle flavor boost and a pop of color [9].
Keep garnish portions small - just enough to enhance the oyster's natural taste. These thoughtful details bring your presentation full circle, from selection to shucking.
sbb-itb-5051793
5. Try New Flavor Combinations
Take your oyster game to the next level with these creative flavor pairings. Step beyond the usual garnishes and discover combinations that complement oysters' natural brininess.
Asian-Inspired Toppings
Give your oysters an Asian twist with these ingredients:
| Ingredient | Amount |
|---|---|
| Pickled ginger (diced) | 1 oz |
| Rice wine vinegar | 2 tablespoons |
| Sesame oil | 1 tablespoon |
| Wasabi | To taste |
For a Thai-style topping, mix the juice from 2 limes, ½ tablespoon fish sauce, 1 oz shredded spring onion, and ½ sliced chili.
Sweet and Tangy Combinations
Fruits can add a refreshing contrast to oysters' salty flavor. Try this pomegranate mignonette:
| Ingredient | Amount |
|---|---|
| Pomegranate seeds | 2.5 oz |
| Shallot (diced) | 1 oz |
| Pomegranate juice | 1 tablespoon |
| Champagne vinegar | 2 tablespoons |
Or, for an apple-inspired twist, combine 2 oz of thin apple strips, 1 oz diced shallot, and 3 tablespoons of cider vinegar for an apple-cider mignonette.
Spicy Fusion Options
Lemon Sriracha Drizzle
- 1 tablespoon lemon juice
- 1 tablespoon Sriracha
- 1 tablespoon honey
Sweet-Sour Habanero Sauce
- ¼ cup rice vinegar
- 1 teaspoon palm sugar
- ¼ teaspoon minced habanero
- ¼ teaspoon salt
Ginger-Forward Topping
Add a bold ginger kick with this mix:
- ¼ cup rice vinegar
- 1 tablespoon minced scallion
- 1 teaspoon grated ginger
- ¼ teaspoon grated garlic
"When serving oysters, it's key to understand their delicate saltwater flavor. Acidic, herbal, and even creamy companions can improve their taste." - Little Wicomico Oyster Company [1][10]
6. Arrange Oysters Properly
Once you've selected, shucked, and chilled your oysters, the final touch is arranging them in a way that’s both practical and visually appealing. A good arrangement keeps the oysters cold and preserves their natural juices.
Choosing the Right Platter
Pick a serving dish that fits the occasion. For large parties, a stainless steel lasagna pan or deep basin works well. For smaller gatherings, a chilled bowl is a better choice. Line the dish with a folded paper towel or cloth, then add a layer of crushed ice to keep everything stable.
How to Arrange Oysters
Place the oysters directly on the ice with the hinges facing inward. This positioning helps keep their juices intact and creates a polished look. Leave enough room between oysters for garnishes.
Keeping It Cold and Secure
Use crushed ice, rock salt, or even crumpled aluminum foil as a base to keep the platter steady and cold. Make sure the foundation stays firm and chilled throughout the event.
Adding Garnishes
Arrange garnishes like lemon wedges, cocktail sauce, fresh horseradish, and a ramekin of mignonette around the oysters. This not only adds flavor but also enhances the presentation.
Serving in Batches
To keep oysters as fresh as possible, serve them in smaller portions. Keep extra oysters chilled and refill the platter as needed to maintain both temperature and visual appeal.
7. Match With Drinks
Pairing the right drink with oysters can take the experience to the next level. Just like proper shucking and chilling, a well-chosen beverage adds the finishing touch to your oyster presentation.
Whether you prefer wine, beer, or non-alcoholic options, the right drink enhances the oysters' natural flavors.
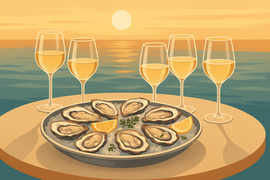
Wine Selections
White wines with bright acidity are a classic choice for raw oysters. Their crispness highlights the oysters' briny notes while balancing the overall flavor.
"A bright, crisp white wine is the quintessential beverage pairing for freshly shucked oysters. The right wine cuts through the oysters' saltiness while complementing their delicate ocean essence." [1]
Here are some excellent options to consider:
- Sauvignon Blanc: Its zesty notes of grapefruit and lemongrass create a refreshing match.
- Unoaked Chardonnay: Brings a subtle richness that pairs beautifully with the oysters' minerality.
- Champagne: The bubbles and clean finish offer an elegant pairing.
Beer Pairings
For beer lovers, lighter styles are the way to go. They won't overpower the oysters' delicate flavors. As oyster expert Rowan Jacobsen explains:
"For beer, crisp pilsner and not too hoppy." [11]
Dry draft beers are particularly effective at keeping the oysters' subtle taste in focus.
Non-Alcoholic Options
For those skipping alcohol, citrus-based drinks are an excellent choice. Options like Strawberry Lemonade or an Arnold Palmer provide a refreshing, flavorful complement to the oysters. These non-alcoholic choices round out your oyster presentation, setting the stage for a memorable serving experience.
8. Set Up a Serving Station
A well-organized serving station ensures oysters are served properly while keeping everything safe and fresh.
Key Areas for Your Station
Divide your station into three sections: preparation, presentation, and condiments. Start with a clean surface near a sink. For the preparation zone, you'll need:
- A sturdy cutting board
- An oyster knife
- A small paring knife for garnishes
- Clean kitchen towels
- A colander to drain melted ice
Once your workspace is ready, the next priority is keeping the oysters at the right temperature.
Keeping Things Cool
Pre-chill your serving platter for about 30 minutes to slow down ice melting. Use crushed ice as your base, but drain it in a colander first to prevent the platter from getting watery.
"There's nothing worse than shooting back an oyster, only to bite down on a piece of shell." - Sasha Marx, Senior Culinary Editor at Serious Eats [2]
After managing the temperature, arrange condiments for easy and neat access.
Setting Up Condiments
Here’s a simple guide for organizing condiments:
| Condiment | Serving Vessel | Utensil Type |
|---|---|---|
| Mignonette Sauce | 4-oz ramekin | Small spoon and fork |
| Fresh Lemon Wedges | Small plate | Tongs |
| Hot Sauce | Original bottle | N/A |
| Horseradish | 2-oz ramekin | Small spoon |
Extra Tips for Success
- Use scrunched aluminum foil to line your rimmed baking sheet. This keeps shucked oysters stable and helps retain their natural juices.
- For larger gatherings, serve oysters in smaller rounds instead of all at once. Keep the unshucked oysters refrigerated at 40°F (4°C) until you’re ready to serve them.
Conclusion
Expert preparation and careful presentation turn raw oysters into an impressive treat. Begin with top-notch oysters, like Little Wicomico Oyster Company's Blackberry® Reserve Oysters, known for their sweet and salty balance.
Store oysters on ice at 40°F (4°C) to keep them fresh, and serve with mignonette, lemon wedges, and a crisp wine. For those looking to improve their shucking technique, the Farm Fresh Oyster Sampler offers premium oysters and all the essentials for $99.00.