


Skip the hassle of shucking oysters entirely. With the no-shuck baking method, you can enjoy perfectly cooked oysters in just minutes. Simply bake them at 450°F for 11–13 minutes, and the shells open naturally - no tools or risks involved. Little Wicomico Oysters are ideal for this, thanks to their consistent flavor and plump texture year-round.
Key Highlights:
- Why it works: Baking eliminates the need for shucking, making preparation simple and safe.
- Best choice: Little Wicomico Oysters, farm-raised and unaffected by spawning cycles, ensure rich, briny flavor every time.
- How to prepare: Add garlic butter, Parmesan, and smoked paprika for a delicious finish.
- Quick steps: Bake oysters, top with garlic butter, broil briefly, and serve.
This method is perfect for casual meals or entertaining guests. Pair with crusty bread and white wine for a complete experience. Leftovers? Refrigerate promptly and enjoy within two days.
Ingredients for No-Shuck Garlic Butter Baked Oysters
Core Ingredients and Measurements
This recipe keeps it straightforward with a handful of essentials. For 2 dozen oysters, you’ll need:
- 1 cup unsalted butter
- 4 garlic cloves, minced or grated
- 2 tbsp fresh lemon juice
- 1/4 cup grated Parmesan cheese
Flat-leaf parsley works perfectly as a garnish, while coarse kosher or sea salt serves a dual purpose: seasoning and creating a stable baking bed to keep the oysters upright and retain their natural liquor.
To finish, sprinkle a little smoked paprika for a pop of color and a subtle smoky flavor. Serve alongside lemon wedges for a fresh, tangy contrast. One tip: make sure your butter is at room temperature to ensure it blends smoothly with the garlic and other ingredients.
With these ingredients prepped, the choice of oysters can make or break the dish.
Why Little Wicomico Oysters Work Best for This Recipe

Little Wicomico Oysters, raised in bottom cages near the Blackberry Hang Oyster Reef in the Chesapeake Bay, are an ideal choice for this recipe. Their briny flavor complements the richness of garlic butter perfectly. Plus, their deep-cupped shells are excellent for holding the butter, Parmesan, and natural oyster liquor without spilling - a key feature for baked oyster recipes.
Another bonus? These farm-raised triploid oysters are plump and meaty all year long, unaffected by spawning cycles that can sometimes alter flavor or texture. Whether you opt for fresh oysters, HPP-processed shuckless options, or pre-shucked frozen oysters on the half shell, they’re ready to bake immediately - no thawing required.
sbb-itb-5051793
Step-by-Step Instructions for No-Shuck Baked Oysters
No-Shuck Baked Oysters Recipe Steps and Timing Guide
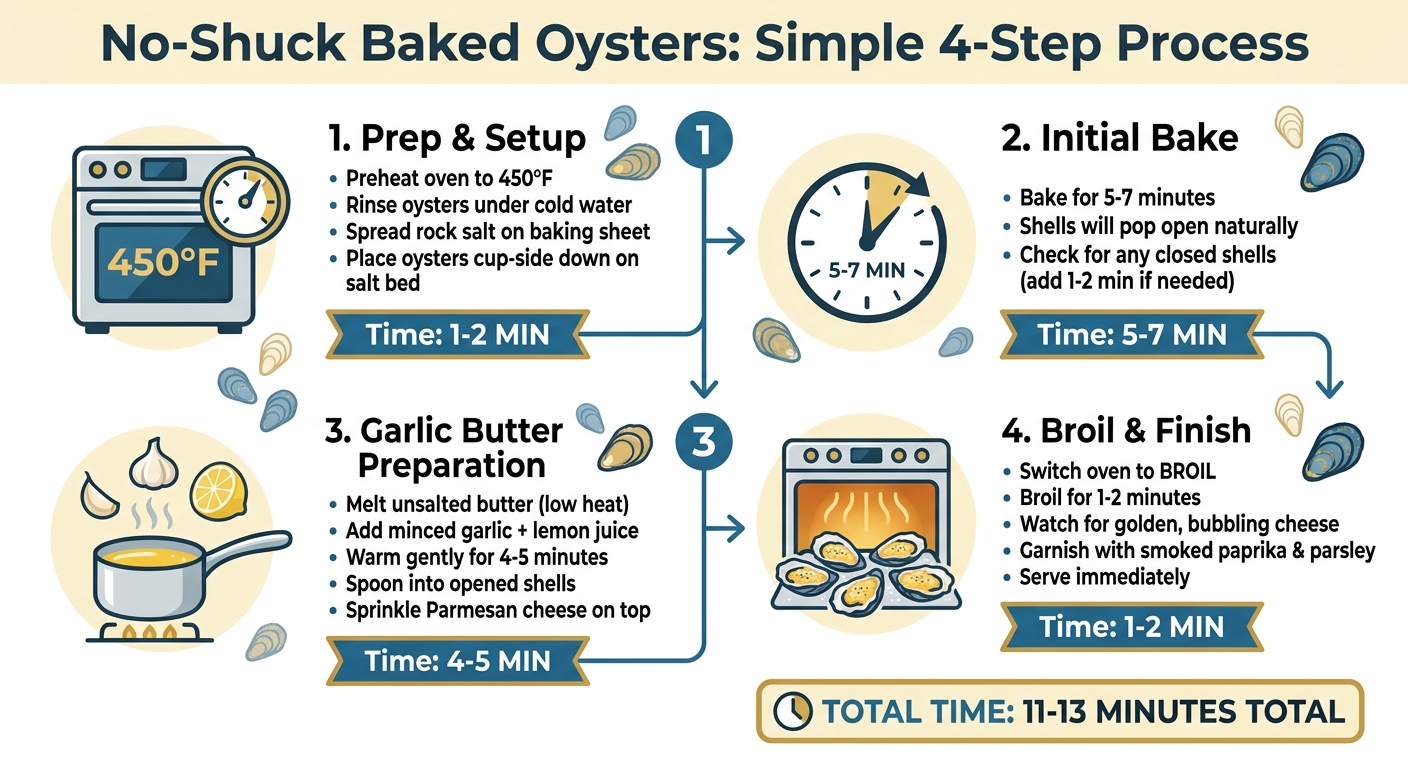
Preparing the Oysters and Baking Setup
This no-shuck method makes oyster preparation easy and stress-free. Start by preheating your oven to 450°F. While the oven heats, rinse each oyster under cold running water, scrubbing gently to remove any sand or debris. Next, prepare a baking sheet by spreading an even layer of rock salt across its surface. The salt bed helps keep the oysters steady and upright during baking, ensuring their natural juices stay intact. Place the oysters on the salt with the curved (cup) side facing down.
Baking and Opening the Oysters
Place the baking sheet in the preheated oven and bake the oysters for 5–7 minutes. You'll know they're ready when the shells naturally pop open - a sign that the heat has relaxed the oyster muscles. If a few shells remain closed, give them another minute or two in the oven, but be careful not to overcook them, as this can make the meat tough. Once the shells have opened, they're ready for the next step: a flavorful garlic butter topping.
Adding Garlic Butter and Broiling
While the oysters bake, prepare the garlic butter. In a small saucepan over low heat, melt unsalted butter, taking care not to let it brown. Stir in minced garlic and add a squeeze of fresh lemon juice. Let the mixture warm gently for about 4–5 minutes, allowing the garlic to release its aroma, then remove it from the heat.
Once the oysters are open, spoon the warm garlic butter into each shell, making sure every oyster is evenly coated. Sprinkle grated Parmesan cheese over the top. Switch your oven to broil and return the baking sheet to the oven for 1–2 minutes, just until the butter starts to bubble and the Parmesan develops a golden crust. Keep a close eye on them during this step to prevent burning.
When they’re done, take the oysters out of the oven and finish them off with a light sprinkle of smoked paprika and some freshly chopped parsley. Serve immediately and enjoy these no-shuck baked oysters, packed with flavor and perfect for any occasion!
Serving Suggestions and Storage Tips
Serving for Entertaining
For a visually stunning presentation, try serving your baked oysters on a bed of coarse sea salt. This keeps the shells stable while also helping to catch any of the rich garlic butter. Let the oysters cool slightly before serving to avoid burns from the residual heat. To brighten up the flavors, include fresh lemon wedges on the side, allowing guests to add a zesty squeeze to balance the buttery richness.
Pair the oysters with crusty French bread to soak up the savory butter, or set them alongside a light green salad and some crackers for a more complete spread. When it comes to beverages, a dry white wine complements the briny, buttery flavors perfectly, while sparkling water provides a refreshing non-alcoholic option. For an extra punch of flavor, consider adding a splash of white wine or a dash of hot sauce before baking.
Once your guests are wowed, make sure to handle any leftovers with care.
Safe Storage and Leftover Tips
If you have leftover baked oysters, refrigerate them as soon as possible at a temperature between 34–38°F to keep them safe and fresh. Place the oysters in an airtight container and aim to consume them within 2 days for the best taste and quality. While baked oysters are at their peak right out of the oven, proper storage ensures leftovers remain safe to eat, though reheating may slightly alter their texture.
Conclusion: Try This Easy Method with Little Wicomico Oysters
The no-shuck baking method takes the hassle out of oyster prep while delivering results that taste like they came straight from a high-end restaurant. With oysters going directly from the freezer to a 450°F oven for just 11–13 minutes, you’ve got a quick and delicious option for those spur-of-the-moment gatherings.
Here’s what customer John W Byrne had to say:
"Made these for Thanksgiving and we're a huge hit!"
It’s clear from glowing reviews and consistent results why this method is a favorite. Whether you’re hosting a party or just looking for a simple yet impressive appetizer, this approach never disappoints. Pairing High Pressure Processing (HPP) technology for easy prep with the rich, briny taste of Chesapeake Bay oysters, Little Wicomico offers the perfect solution for stress-free entertaining.
FAQs
How do I know an oyster is safe to eat if it doesn’t open in the oven?
When cooking oysters, one that doesn’t open in the oven might still be fine to eat, as long as it was alive beforehand. To confirm, tap the shell gently. If it feels solid or stays firmly shut, it’s probably safe. On the other hand, if the shell is open and doesn’t respond by closing when tapped, the oyster is no longer alive and should be thrown out.
Can I use HPP or frozen oysters for this no-shuck baked method?
Yes, both HPP (High-Pressure Processed) and frozen oysters work perfectly for this method. The recipe emphasizes the ease of using frozen oysters on the half shell - they come pre-shucked and ready to bake, offering a hassle-free and convenient option.
What’s the best way to keep baked oysters from tipping and spilling their liquor?
To keep baked oysters steady and prevent their flavorful juices from spilling, make sure they’re positioned securely. You can use a baking dish or create a bed of coarse salt to hold them in place. Always arrange the oysters with their rounded, deeper side facing down - this helps contain the juices and keeps them stable while baking. This simple technique ensures the oysters stay upright and retain their delicious liquor.


